Wednesday, September 4, 2013

Cut Plane in Family Templates

This came as news to me, but there is a cut plane in Autodesk® Revit® family templates that can affect visibility while in the family editor. Here is the situation where I discovered this:

I am a fan of creating reference planes in families to drive the geometry. But I also usually adjust the length of the planes to extend only a short distance past the relevant dimension. I cannot recall this being an issue until today while working on a new family using the Generic Model template.

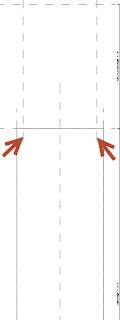
This family is for an IT cabinet with a top-mounted exhaust duct connection. The cabinet is over 7' 6" tall and the hard connection for the duct sits on top of the cabinet. So I drew my duct connection reference planes in the Ref. Level view. As you can see, I shortened them up so they only extend a short distance past each other.


I then switched to the Front view and shortened up the reference planes there too.


When I switched back to the Ref. Level view, the reference planes and their dimensions were gone! I knew that I had not deleted them and nothing was temporarily hidden. When I switched to the Ref. Level ceiling plan view the reference planes and their dimensions were showing.

I immediately thought, "Hmm, seems like a view range issue," but, of course, there are no view properties in the Properties Palette while nothing is selected in the family editor, unlike the normal editor. The Properties Palette displays the properties of the family when nothing is selected. Was I stuck? Would I have to extend the reference planes down below 4' 0"? (Which did work, by the way.)

 
Happily, I did find that the Properties Palette will display the view properties when you select the view in the Project Browser while in the family editor. I adjusted the clip plane to 7' 4" and, poof!, the reference planes and their dimensions reappeared in the Ref. Level plan view.

 
Autodesk, the Autodesk logo, AutoCAD, Navisworks, and Revit are registered trademarks or trademarks of Autodesk, Inc., and/or its subsidiaries and/or affiliates in the USA and/or other countries.

Friday, August 16, 2013

Scope Boxes Visibility

I'm a big fan of Autodesk® Revit® scope boxes. I'm also a big fan of Quality Control (QC) views. And therein lies a bit of a rub.

I advocate that a model should have a group of views where each view is dedicated to doing a QC on a specific feature. For example, set up a view that is dedicated to making sure that the grids in the model are in the Shared Levels and Grids workset. The only elements the view displays are the grids that are not in the correct workset. If the view is blank, then the model passes that particular QC item.

I create a QC view to do the same thing for scope boxes. I place those in Shared Levels and Grids too because other firms that link in our model don't need to see our scope boxes, right? So why not put them in the workset that everyone turns off already to get rid of the levels and grids in the linked model?

Now here is the tricky part:

I usually turn off all model categories and all annotation categories except the desired category. However, when I did that, no scope boxes were visible! They were there. I could hover over one with my cursor and select it. But I could not see them. I double-checked visibility settings. I made sure that the scope boxes themselves were set to be visible in that view. No joy.


I then turned on the model categories and, to my surprise, the scope boxes immediately became visible. I thought that the display must somehow be tied to the Generic Models or Lines category but when I isolated to just those categories the scope boxes still disappeared. So I laboriously went thru all the categories, turning them off in small batches, to try to isolate the relevant category.

And it turned out to be something else entirely. As usual. It seems that scope boxes won't be visible unless there are model elements also visible. You see (groan), there were no elements in Generic Models or Lines and that's why the scope boxes disappeared. When I turned on the Electrical Equipment category, or any other single model category that had elements, the scope boxes became visible.


This is a bit unsatisfying because I can't make the QC view blank when everything is ok with the scope boxes. I did change the color and half-tone the Electrical Equipment category, but I'm worried someone will try to "fix" those elements too. Time will tell!

Autodesk, the Autodesk logo, AutoCAD, Navisworks, and Revit are registered trademarks or trademarks of Autodesk, Inc., and/or its subsidiaries and/or affiliates in the USA and/or other countries.

Thursday, August 15, 2013

Filter a Revit Schedule for Whole Values

I saw an interesting question asked in the BIM + Revit MEP LinkedIn group the other day. The question was if it was possible to use wildcards in a schedule's filters (nope). But the real question was: would it be possible to filter a schedule so that it only displays values that are not whole numbers (integers).

It would be wonderful if I could provide an example using Autodesk® Revit® MEP's Elevation parameter, but alas, that built-in parameter is still not available for tagging or schedules.

However, here is the approach I used with a shared parameter used to report elevation. I am using three calculated values. I could get by with just one, but I like the idea of having one value to convert the elevation to a real number and one value to calculate the whole number, for QC purposes, and the third value to provide the actual filtering.

 
Here are the fields that I used:
  1. Sparling Mounting Height: Shared parameter, Length, that reports the elevation of the element. How I wish I could use Elevation here!
  2. Elevation As Number (can be hidden): Calculated value, Number, using this formula: (Sparling Mounting Height / 0' 1")
  3. Whole Value (can be hidden): Calculated value, Number, using this formula: round(Elevation As Number)
  4. Is Whole (can be hidden): Calculated value, Yes/No, using this formula: Elevation As Number = Whole Value 

Note that the Round function does not work with lengths so it is neccessary to normalize the value from Sparling Mounting Height: (Sparling Mounting Height / 0' 1")

Update: Bruce Johnson pointed out that I could normalize using inches rather than feet and Revit converts the value correctly.

Because lengths are stored in Revit as decimal feet, the normalized value needs to be converted to inches before it is rounded: (Sparling Mounting Height / 1') * 12)


I round the calculated value of the elevation, in inches, normalized to a number to be used to test if the original value was a whole number.


Finally, we do the actual test to provide a Yes/No result that can be used to filter the schedule.


I also wish that I could resize the Calculated Value dialog so that it would be easier to document my schedules. However, I have no fix for that, other than adding it to the AUGI wishlist.

Autodesk, the Autodesk logo, AutoCAD, Navisworks, and Revit are registered trademarks or trademarks of Autodesk, Inc., and/or its subsidiaries and/or affiliates in the USA and/or other countries.

Tuesday, August 13, 2013

Revit Element IDs, Really?

Autodesk® Revit® has a useful function under the Manage tab to list the element IDs of your current selection. It does a nice job of handling multiple selections and allows you to copy-and-paste the IDs.

That's the good news.


The half-baked part? Look what the corresponding dialog to select by element ID says to use to separate multiple object IDs.


Yes, that's right, this dialog says it wants semi-colons (;) and not the commas (,) given by the Element IDs of Selection dialog.

Happily, there is a solution! Just ignore the lying text and use commas anyway. The dialog honors both semi-colons and commas for multiple IDs. See! I did provide a solution!


Autodesk, the Autodesk logo, AutoCAD, Navisworks, and Revit are registered trademarks or trademarks of Autodesk, Inc., and/or its subsidiaries and/or affiliates in the USA and/or other countries.

I Can't Help It

As the title says, I can't help but begin blogging just to share my musings on the state of the applications that I use on a regular basis. In the words of a good friend and long-time blogger, Kate Morrical, I don't want this to become just another blog complaining about bugs. I hope to offer techniques and work-arounds for most of the issues I discuss. Granted, there will be some things that won't have a satisfactory resolution but I will try my best to provide one.

I will be covering several of the Autodesk applications, including Autodesk® Revit® MEP, AutoCAD®, and Autodesk® Navisworks®. Other applications will include Microsoft® Office® and whatever else strikes a nerve that day.

And so it begins!

Autodesk, the Autodesk logo, AutoCAD, Navisworks, and Revit are registered trademarks or trademarks of Autodesk, Inc., and/or its subsidiaries and/or affiliates in the USA and/or other countries.
Microsoft and Office are either registered trademarks or trademarks of Microsoft Corporation in the United States and/or other countries.